
With more companies migrating their on-premises email systems to Office 365, many clients are interested in sending emails via Office 365 in their Sage 500. With Office 365, Microsoft made the process of relaying email much easier by giving organizations the capability of creating custom connectors in the admin UI.
One example in which you might need to set this up would be with Sage MAS 500 document transmittal. Document transmittal gives you two types of email transport methods. You can either send using the Exchange method or the SMTP method. These two methods are very different from each other in that the Exchange method requires that Outlook be installed on the same machine as the MAS 500 client whereas the SMTP method makes a direct SMTP connection from the MAS 500 client to the SMTP server specified in the document transmittal configuration.
Note: Your database server does not generate and send out the email unless you are testing the MAS 500 client from the server itself. The SQL server sends the email only if you have integrated and are using SQL dbmail.
At this point, I am not aware of a way to allow the Exchange method to work without an Office 365 hybrid deployment where you always maintain an Exchange server on-premises. This leaves SMTP as the chosen method.
There are three main options in which you can send email through Office 365. Microsoft already has an excellent article published in which you can review at the following link (http://bit.ly/2fl98v4). The three options are:
- Authenticating via SMTP client submission
- Direct send
- SMTP relay
Since MAS 500 does not allow you to configure authentication settings within the document transmittal settings page, that eliminates option one (unless you have an internal SMTP relay in which you could smart host your email to Office 365). The second option is a viable solution however just know that you are limited to sending email to your internal organization and not external recipients. So if you’re looking to send sales orders, invoices, etc., to external recipients then you will want to go with option three.
We’ll use option three as the example. Information that you are going to need in advance are as follows.
- The public IP address/range in which the MAS 500 clients will be sending the email. You can find your external IP address by going to Google from one of those machines and searching “What is my IP”.
- Your Office 365 MX endpoint, e.g. yourcontosodomain-com.mail.protection.outlook.com
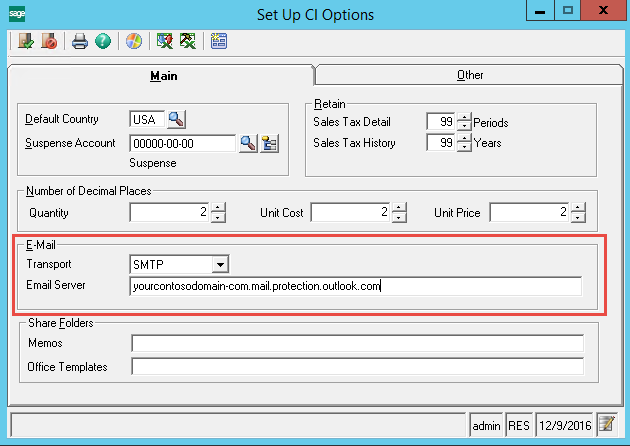
To start, login to your MAS 500 client as an administrative user. Navigate to the ‘Common Information’ section and expand Maintenance -> CI Setup -> double-click ‘Set Up CI Options’. Configure the email section with appropriate information for your email organization making sure to select SMTP as the transport type. Go ahead and save and close this window.
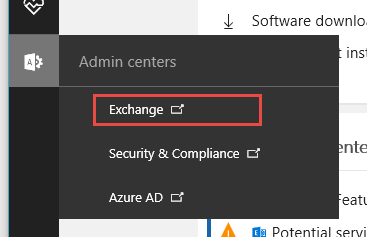
Next you will want to login to your Office 365 admin center with an administrative account. In the admin centers section click on the Exchange option.
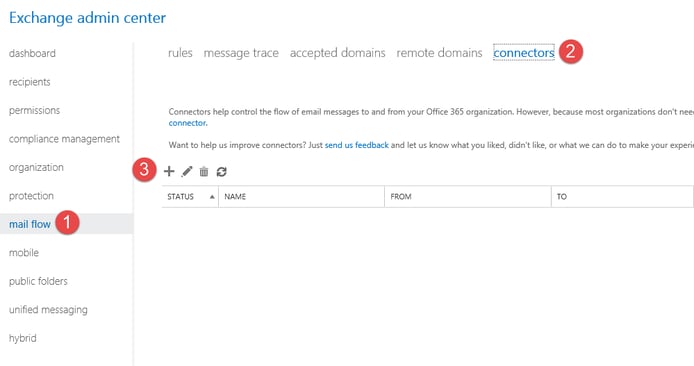
In the Exchange Admin Center, you will want to navigate to Mail Flow -> Connectors. Click on the plus sign to create a new connector.
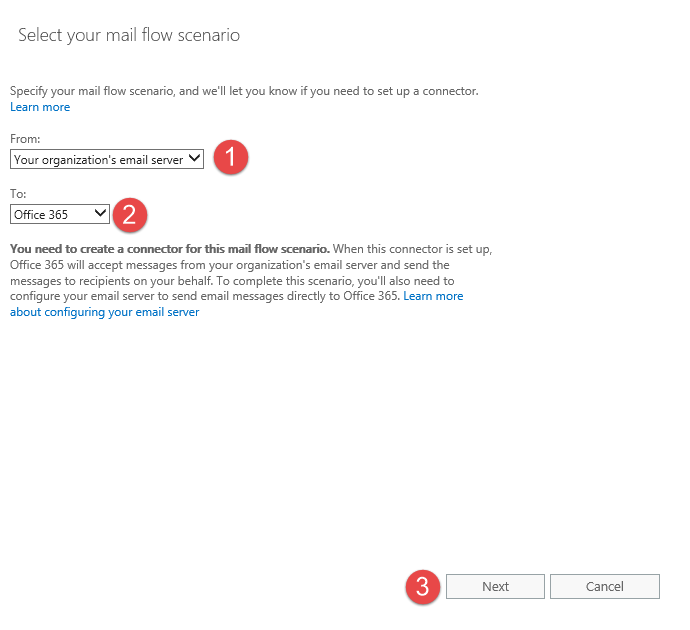
In the “from” dropdown box, select “Your organizations email server”. In the “To” dropdown box select “Office 365”. Go ahead and click next.
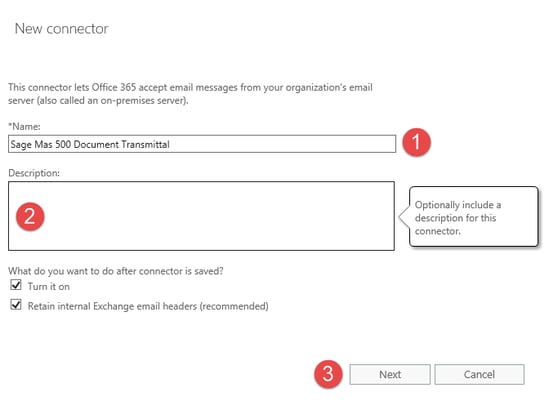
Enter a display name for the connector you’re creating and a description if you’d like. Leave both check boxes selected and click next.
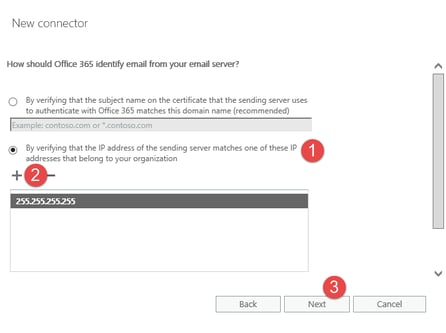
On the next screen, select the second option “By verifying that the IP address of the sending server matches one of these IP addresses that belong to your organization”, click the plus sign and enter the public IP address you collected at the beginning of this process.
Click next and then save and you should be good to go to test an email through the MAS 500 client. We have found that this provides a more simplified approach to sending email via Office 365 versus the alternative of setting up an internal SMTP relay.
Did you read our Sage 500 ERP blog on how to automate your Sage 500 ERP daily aging recalculation?


