Let's face it - mistakes happen all the time in business. Whether you sent a payment to the wrong vendor, issued a check in the wrong amount, or have to apply a stop payment - there are plenty of situations where you may need to Reverse a Check in Sage 100 ERP.
Here are the steps to reverse a check in Sage 100 (formerly "MAS 90") Accounts Payable.
If you have a check to reverse without Job Cost distributions, follow these steps:
- Select Modules, Accounts Payable, Main, Manual Check Entry.
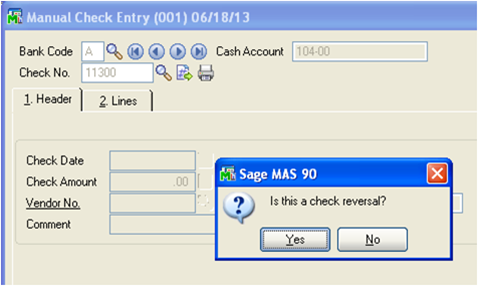
- In the Bank Code field, enter the bank code associated with the check to reverse.
- In the Check No. field, enter the check number of the check to reverse.
- Click Yes in response to the question, "Is this a check reversal?"
- Click Yes in response to the question, "Recall original invoices?" to reopen the original invoice.
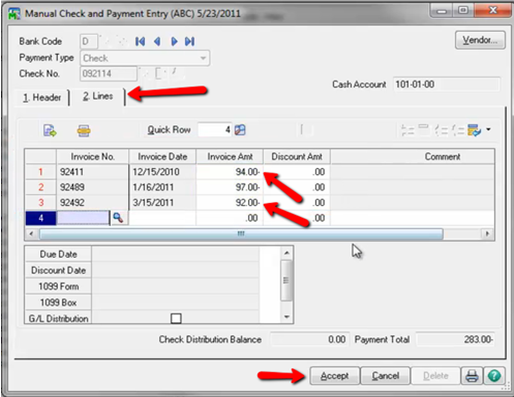
Note: If you click No, skip to Option 2. - Click Accept on the Lines tab where the invoice will be displayed with a negative amount. This will adjust the invoice balances back into Accounts Payable.
- Print the Manual Check Register and then Click Yes to Update Check Register.
Option 2
If at Step 5 you click No to "Recall Original Invoices" and leave the original invoice(s) closed, here are the remaining steps:
From the Lines tab, select the GL Distribution Button/Icon. Enter a GL Account and enter the original amount of the check as a negative value.
Click Accept, print the Manual Check Register, and Update Check Register.
NOTE 2: The process for reversing a check With Job Cost Distributions is slightly different.
If you need a little help, contact us for assistance.
That's how you reverse an AP check in Sage 100 ERP!


